The editor at a glance
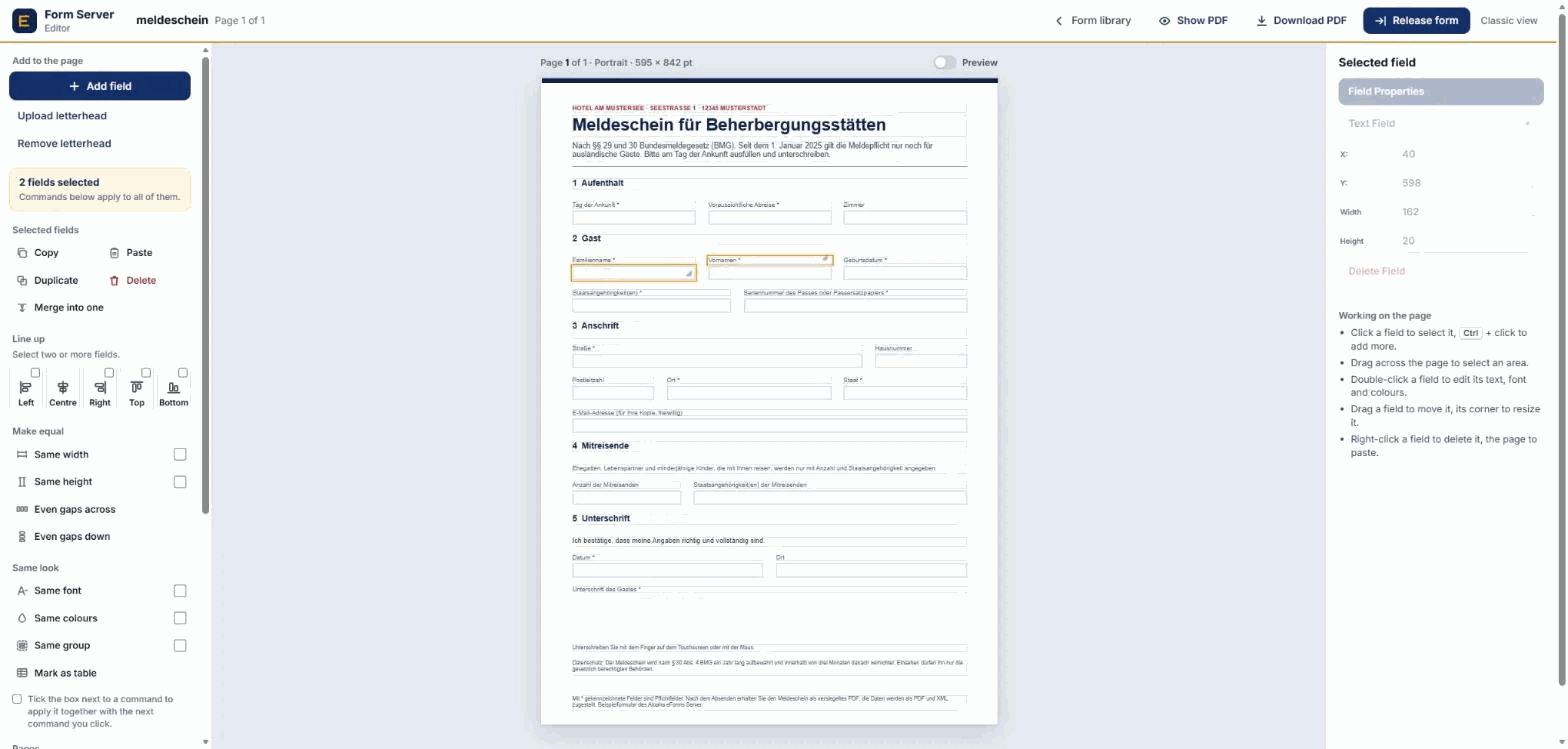
Open a form from the form library with edit, or create a new one with Create new form. The editor has four areas:
- Top bar: the form name and page count, and the actions for the whole form: Form library (back), Show PDF, Download PDF and Release form.
- Tools on the left: add fields, work with the selected fields, pages, and undo.
- The page in the middle: what you see here is what the form looks like. Every field sits exactly where it will be in the PDF.
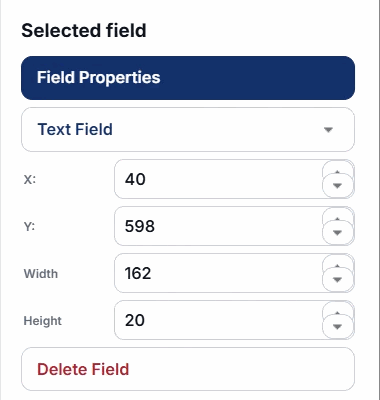
- Selected field on the right: type, position and size of the field you clicked, and short tips.
Hover over any tool to see what it does. On a phone or tablet see below.

Adding fields
Click Add field at the top of the tools. A new field appears in a corner of the page; drag it to its place.
Every new field starts as a text element. Choose what it should be in the type list on the right (Selected field):
- Text Field: an input box the person fills in.
- Plain Text: fixed text such as headings, labels and notes.
- Drop Down, Check Box, Radio Button: choices.
- Image, Line, Button: pictures, rules and buttons.
Letterhead
Upload letterhead puts a PDF or image behind the page, for example your company letterhead or a scanned paper form to trace. Remove letterhead takes it away again.
Selecting, moving and resizing
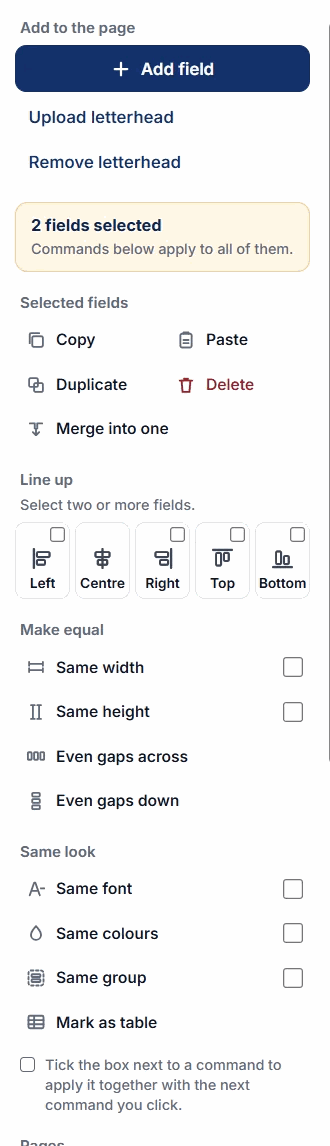
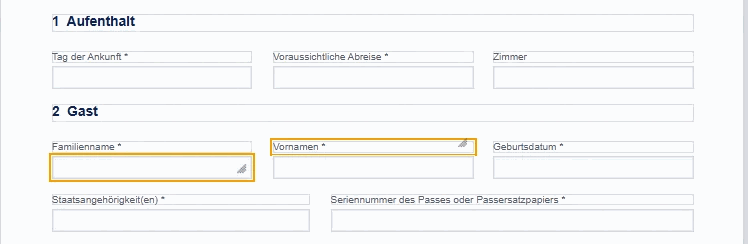
- Select: click a field. It gets an orange frame.
- Select several: hold Ctrl and click more fields, or drag a rectangle across an empty part of the page.
- Move: drag the field.
- Resize: drag the small handle in its bottom-right corner.
- Exact values: type X, Y, width and height on the right. Values are in points (1/72 inch, the PDF unit). X is measured from the left edge, Y from the bottom edge of the page, as in a PDF.
- Delete: Delete Field on the right, Delete in the tools, or right-click the field.
The box at the top of the tools always tells you how many fields are selected.
Field properties
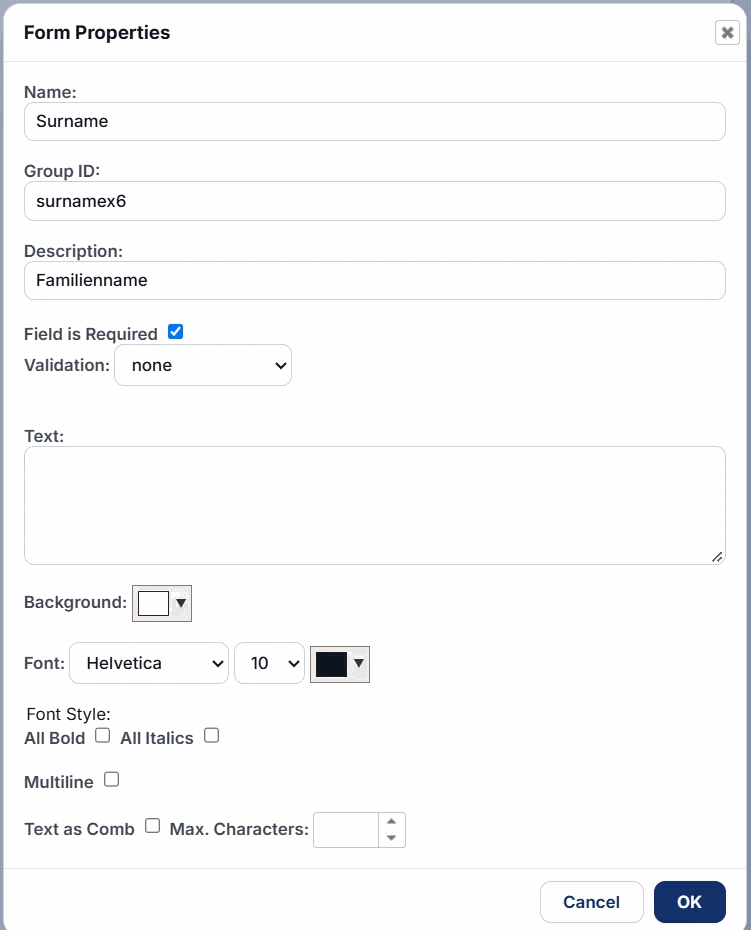
Double-click a field, or click Field Properties on the right, to open its properties:
- Name: the field name in the PDF and in the XML data you receive. Use short, unique names such as
Surname. - Group ID: fields with the same group belong together, for example the radio buttons of one question.
- Description: the label shown to the person filling in, also used in messages and in the HTML version.
- Field is Required and Validation: make the field mandatory and check the input, for example an e-mail address, a date or a postcode.
- Text: preset text, or the text of a Plain Text element. Toggle HTML switches to formatted text.
- Background, Font, size and colour, Bold, Italics, Block Justify.
- Multiline: allows several lines of input. Text as Comb with Max. Characters spreads the characters evenly in boxes, as on paper forms.
Click OK to apply, Cancel to discard. Images have their own small dialog to upload the picture; buttons and lines have one for label, colours and action.
Arranging several fields
Select two or more fields, then use the tools on the left:
- Selected fields: Copy and Paste (tip: right-click the page and choose Paste to put the copies exactly there), Duplicate (copy next to the original), Delete, Merge into one.
- Line up: align the left, centre, right, top or bottom edges.
- Make equal: same width, same height, even gaps across or down.
- Same look: same font, same colours, same group, or mark the fields as a table.
Combining commands
Some commands have a small box next to them. Tick it, and that command also runs together with the next command you click. Example: tick Same width, then click Left: the fields get the same width and are lined up on the left in one step.
Pages
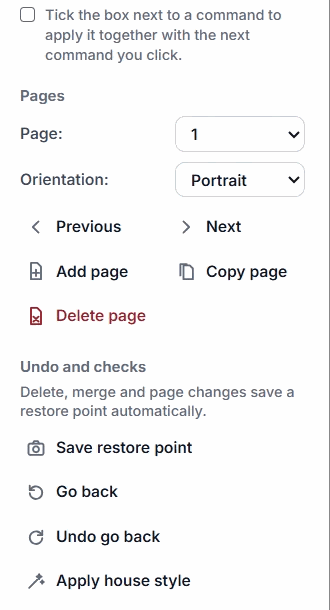
A form can have several pages. Under Pages:
- Page and Orientation: jump to a page, switch between portrait and landscape.
- Previous and Next: move through the pages.
- Add page, Copy page (with all fields), Delete page.
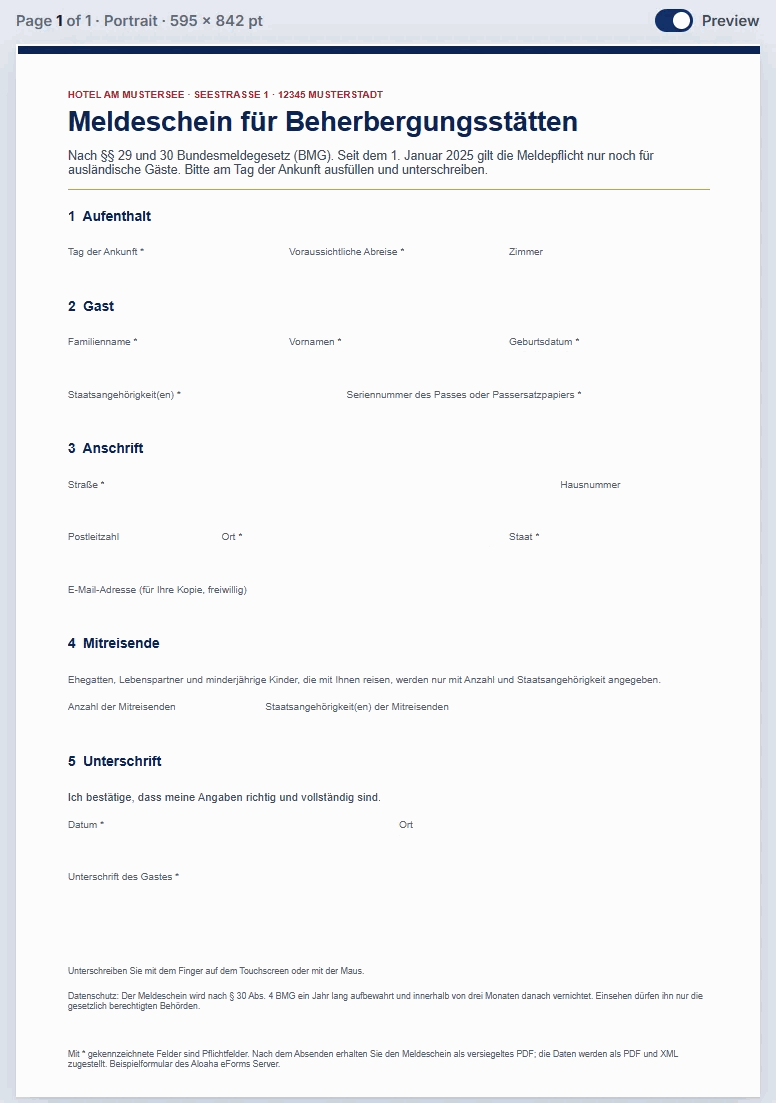
The line above the page shows where you are, for example Page 1 of 2 · Portrait · 595 × 842 pt (A4).
Undo and house style
- Save restore point: remembers the current state of the form.
- Go back: returns to the last restore point. Undo go back reverses that.
- Apply house style: sets left margin, width, height, font and colours of all fields from the style rules of your server, so every form looks the same.
Delete, merge, page changes and the house style save a restore point automatically before they change anything.
Preview and PDF
While you work, the fields have light outlines so you can find them. Switch on Preview above the page to hide all outlines and handles: the page then looks like the released form.
Show PDF creates the PDF and opens it in a new tab. Download PDF saves it.
Releasing the form
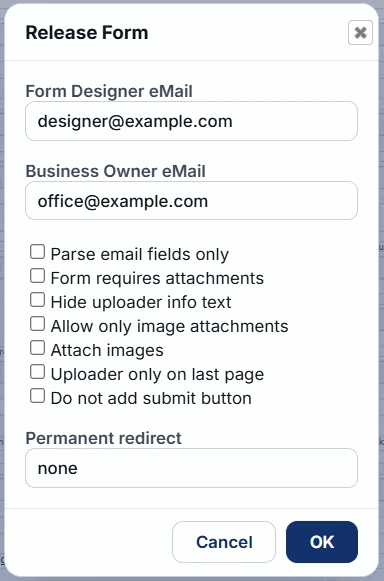
A form is public only after it was released. Click Release form in the top bar:
- Form Designer eMail: your address; you get notices about the form.
- Business Owner eMail: receives every submission as a sealed PDF with the data as XML.
- Options for attachments (required, images only, uploader on the last page), the submit button and a permanent redirect. Depending on the server there are more options, for example sign-in before filling in.
Click OK. The server then creates the PDF, the responsive HTML and the static HTML of the form. Release the form again after every change; until then visitors see the previous version.
On a phone or tablet
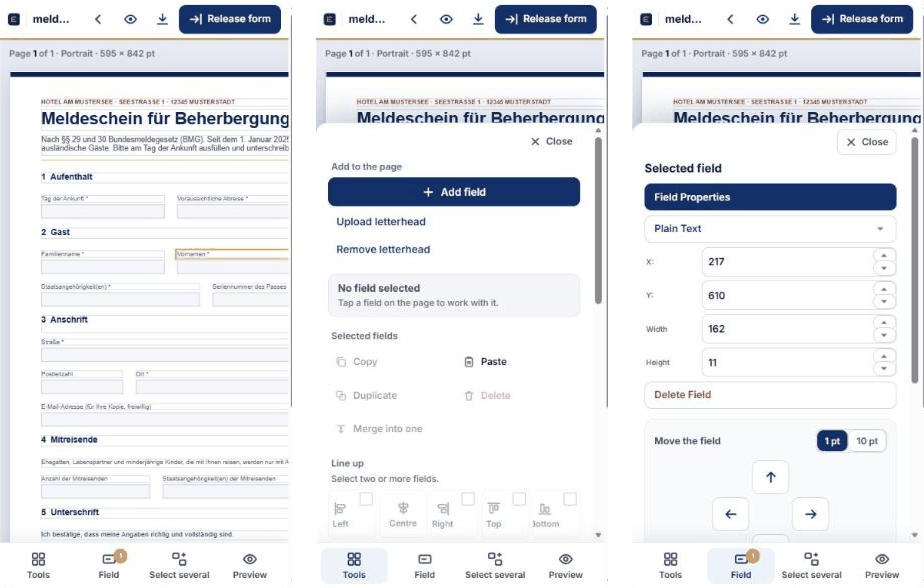
The editor also works with your fingers, on tablets and phones. On a phone the tools and the selected field open as panels from the bar at the bottom: Tools, Field (the number shows how many fields are selected), Select several and Preview.
- Select: tap a field. Tap it again to deselect it.
- Move and resize: drag a selected field with your finger, or drag the orange dot in its corner to resize it. Swiping anywhere else scrolls the page, so you never move a field by accident.
- Exact position: under Field, the arrows move the field by 1 pt or 10 pt; width and height are set in the boxes above them.
- Several fields: turn on Select several, then tap the fields. Turn it off again when you are done.
- Properties: double-tap a field, or tap Field Properties under Field.
- Zoom: the page is shown at its real size; pinch to zoom out and see the whole page.
Classic view
The previous layout of the editor is still there: click Classic view at the right of the top bar. Switch to the new editor (bottom right) brings you back. Both work on the same form and give exactly the same result; the browser remembers your choice.
Questions and answers
Does the editor show the form exactly as it will look?
Yes. Every field is shown at its real position and size in points, with its font and colours. Switch on Preview to hide the editing outlines; Show PDF displays the generated PDF.
How do I select several fields?
Hold Ctrl and click the fields, or drag a rectangle across an empty part of the page. The box at the top of the tools shows how many fields are selected.
Why are some tools grey?
They work on selected fields. Select one or more fields on the page and they become active.
Why does my change not appear in the public form?
Visitors see the released version. Click Release form again after changes.
Can I undo a mistake?
Yes. Go back returns to the last restore point; delete, merge and page changes save one automatically. Save restore point creates one whenever you like.
Can I use the editor on a phone or tablet?
Yes. Tap a field to select it, then drag it with your finger to move it. On a phone the tools and field settings open from the bar at the bottom; Select several replaces Ctrl + click and the arrows under Field move a field exactly.
Where is the old editor?
Click Classic view in the top bar. Switch to the new editor brings you back.
Try it with your own forms
Ask for a free online presentation or a free 30-day trial.
Last updated: